
How the professionals install artificial grass.
A great-looking lawn that lasts is all in the build beneath it. Here's how a proper artificial-grass installation comes together, base, drainage, joins and finish, written for Singapore's heat and monsoon rain. We design, supply and install the lot ourselves, but if you're planning a DIY job, this is the right order to work in.
What you'll need.
The basics for a clean, durable install.
- Namgrass turf (plus ~5–10% for cuts)
- Crushed aggregate & sharp sand, or drainage cells for hard surfaces
- Weed membrane & edge restraints
- Jointing tape & adhesive; fixing pins
- Shockpad & kiln-dried sand (where needed)
- Plate compactor & screeding bar
- Sharp utility knife & carpet cutter
- Stiff brush or power broom
- Tape measure, hammer, gloves
- Wheelbarrow & rake
The installation, in order.
Eight stages from bare ground to a finished lawn.
Plan & measure
Measure the area and add about 5–10% for cuts and joins. Plan the roll direction so all the pile leans the same way, and note where water needs to fall away.
- Measure length × width
- Plan pile direction
- Order a little extra
- Check the fall for drainage
Clear the area
On soil, remove the existing turf and excavate roughly 75–100mm. On a hard surface like concrete or a balcony, simply clean it down, no digging needed.
- Strip existing grass/soil
- Or clean the hard surface
- Remove roots & debris
Build the base
On ground, lay and compact a crushed-aggregate sub-base, then a layer of sharp sand or granite dust, screeded level to the fall. On slabs, balconies and rooftops, lay drainage cells instead.
- Compact aggregate sub-base
- Sharp sand / granite dust blinding
- Drainage cells on hard decks
- Grade to fall, then level
Membrane & edges
Lay a weed membrane to keep the base clean, and fix solid edge restraints so the lawn stays put and crisp at the borders.
- Weed-control membrane
- Edge restraints / timber
- Square up the perimeter
Shockpad (play areas)
For playgrounds and childcare, lay a ProGame shockpad over the base, specified to the equipment's critical fall height, before the turf goes down.
- Critical-fall-height rated
- Lays over the base
- Softer, safer landing
Roll out & settle
Roll the turf out, all pile facing one way, and let it acclimatise so it relaxes flat, important in Singapore's heat, before any cutting.
- Pile all one direction
- Let it relax flat
- Avoid stretching
Cut & join
Trim neatly to the shape, then join lengths with jointing tape and adhesive (or hidden stitching) so the seams disappear into the pile.
- Trim to shape
- Jointing tape + adhesive
- Hide the seams
Secure, infill & finish
Fix the edges with pins or adhesive. Add kiln-dried sand infill where needed (mainly sports), then power-brush the pile upright and rinse. Done.
- Pin / glue the edges
- Sand infill if required
- Brush up & rinse
The trick to an invisible seam.
The join between two lengths is where a DIY lawn usually gives itself away. The fix is in how you cut the two edges — one long, one short — so the pile folds over the seam and hides it.
- 1Cut in the gutter. On both pieces, run the knife along the backing between two stitch rows — never through a row, or you leave a bald strip at the join.
- 2One long edge, one short. Trim one edge tight to the backing (the short side) and leave the mating edge with an extra row of longer yarn (the long side).
- 3Butt, tape and fold over. Join the two backings over jointing tape with no gap; the longer yarn lies across the shorter side and covers the seam line completely.
- 4Brush across the join. Power-brush against the pile so the fibres from both sides blend, and the seam vanishes.
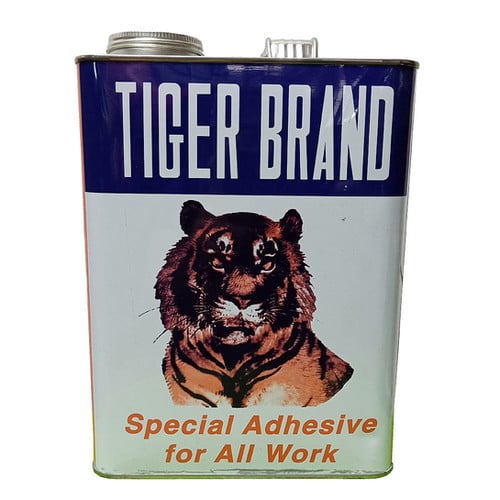
The Tiger glue trick.
A folded seam only stays invisible if it never lifts. We bond ours with Tiger Brand Special Adhesive — a solvent-based contact glue that grips the backing and holds flat through years of Singapore heat, humidity and foot traffic. The whole trick is in how you use a contact adhesive, not how much.
- 1Clean and dry both faces. Wipe the turf backing and the jointing tape free of dust and moisture — a solvent adhesive won't grab a damp or dirty surface, and that's where lifting starts.
- 2Coat both sides, thin and even. Spread a thin film on the tape and the underside of the grass. Contact glue bonds to itself — one side alone will never hold.
- 3Wait for it to go tacky. Leave both coats a few minutes until they're touch-dry — the glue should string but not transfer to your finger. This flash-off is the step DIY jobs skip, and it's what makes the bond instant and permanent.
- 4Press, weight and leave. Fold the seam together with no gap, press the full length firmly (a roller or weighted board), then keep traffic off until it cures. Done right, it holds flat for the lawn's entire lifespan.
Soil, concrete or rooftop.
The base changes with what's underneath, the turf finish stays the same.
Dig out, compact a crushed sub-base, blind with sharp sand, then membrane and turf. Graded to fall for drainage.
No digging, lay drainage cells (or a thin sand base) over the slab so water clears, then the turf goes straight on top.
Lightweight drainage cells carry water to the outlet and protect the waterproofing, with the turf cut neatly to the space.
When to call us in.
- Small, flat, simple areas
- Decorative patches or temporary layouts
- Where drainage isn't critical
- Gardens, rooftops & balconies
- Anything needing falls & drainage
- Seamless joins over larger areas
- Play areas needing shockpads
- To keep the 10-year warranty intact
See what a hard install really takes.
Getting tonnes of sand into a walled garden or turf up to a rooftop with no lift is where DIY stops. Watch how our team handles the access problems most installers turn down.
Rather we handled it?
We design, supply and install every layer ourselves, base, drainage, shockpad and turf, so it's done right and covered by one 10-year warranty. Explore the products, or read the buying guide first:
Installation questions.
Can I install artificial grass myself?
How long does installation take?
Can artificial grass be laid over concrete or tiles?
How is drainage handled in Singapore's heavy rain?
Do I need sand infill?
Want it installed properly?
Book a free site visit, we'll assess the base and drainage, recommend the right turf, and install it end to end with a 10-year warranty.
Chosen by Singapore's landmark names
From resort poolsides and hotel rooftops to preschools and attractions — a selection of the clients who trust our premium Namgrass installs.
 Shangri-La Rasa Sentosa
 Holiday Inn
 iFly Singapore
 Royal Albatross
 Far East Plaza Residential
 PCF Sparkletots
 Marina Bay Sands